1991 Golf GTi project

Gaz86

RMS Regular
Messages
4,609
Location
A land far far away
So next up was to get the rev counter working. The VR6 sends the rev counter signal digitally to the mk3 clocks but the mk2 clocks expect to see an analogue pulse from a coil. So time to knock together some wires, diodes and heat shrink and run it all from the coil to the clocks. Taking signals off 2 of the 3 coils will make the 6cyl rpm work properly with the 4cyl clocks:

View attachment 428642
View attachment 428646
View attachment 428645
View attachment 428644View attachment 428643
View attachment 428641
View attachment 428640

So once I test started the engine it started and ran perfectly. Happy days, my wiring loom extension didn't cause any issues.

Did the rev counter work? Did it ****! But we'll revisit that some other day 😂

Then i wrapped the loom in the bay:

View attachment 428649

Oddly I don't have a finished pic of it.

And spiral wrapped the rest of the loom back into the car and I'll fix it to the power cable properly when the front end goes on:

View attachment 428651

Then it was time to move inside and sort out all the wiring mess I'd ran behind the dash:

View attachment 428647
View attachment 428648

Once I get the wiring ran inside and out permanently I'll put up the finished pics.

One of my new genuine fuel lines appeared and I got it fitted too. The rest is coming this week along with a bunch of other bits:

View attachment 428650

Connor

I read that with the A Team music playing in my head 🤣🤣🤣 Fair play mate. Job well done 👍🏻
 

natogreen16v

RMS Regular
OP
natogreen16v
Messages
8,736
Location
Space
Drives
Stuff
So this weekend it was all hands to the pump again.

After getting home from work on Friday I started into fitting the MK4 02J shifter and cables for the gearbox.

The frame in the tunnel under the car would not take this shifter at all so the tools were broken out.

It started like this:
1000058266.jpg


Then after a tickle with the grinder and belt file I ended up with this. Then it was marked up and 2 rivnuts inserted to bolt the back of the shifter into:
1000058277.jpg


This is the shifter. The 2 studs at the front end needed swapped for longer ones:
1000058278.jpg


So it was stripped down to swap them out for longer M8 bolts and offered up:
1000058279.jpg


Then the position of the front studs were marked on the floor, drilled and offered up to find this:
1000058283.jpg


Then the studs were trimmed down and edge of the opening was filed back to allow the bell crank to move through it's full range:
1000058294.jpg


And how it looks underneath all sealed and painted again:
1000058296.jpg


Saturday morning I got out and next up was to sort the fuel system.

I fitted the new genuine feed line from the filter to the engine and despite it being a genuine VW part with the correct sticker there was something up because it was slightly longer. Stone Motorsport binned the OG filter mount and their attempt at one was awful so I bit the bullet and made my own from nylon and tried to use some of the existing holes they'd drilled in my floor so I wasn't drilling any more. I installed Rivnuts and ended up with this.

1000058342.jpg

1000058344.jpg


I'll weld up any of the remaining holes from their attempt and seal it all up.

And the fuel lines mounted:
1000058345.jpg


More to follow

Connor
 

natogreen16v

RMS Regular
OP
natogreen16v
Messages
8,736
Location
Space
Drives
Stuff
Saturday afternoon my Amazon order of 5mm rope arrived so armed with it, PTFE spray and a new windscreen Stefan and I got to work. I didn't take any pics as its a job I hate but after 20mins of ****ing around we were left with this:
1000058356.jpg


With the windscreen in that meant I could fit the dash and the other interior bits.

How it started:
1000058360.jpg


Dash shell in:
1000058364.jpg


Furnishing the dash with all its wee vents, bezels etc. I didn't remove any of this and it's years since I owned a mk2 so this was a slow process:

1000058386.jpg


At this point I realised I was missing the lower dash panels and centre console so I moved onto the rest of the interior:

1000058388.jpg

1000058389.jpg


Under the dash starting to look tidier already:
1000058390.jpg


A quick 23:00 phone call from the back seat sorted me with all the missing interior pieces I needed and I'll lift them this week:
1000058395.jpg


Then to finish the night off I got the last door card on:
1000058422.jpg


I really love this interior. I can't wait to get the dash buttoned up and the front seats in.

Sunday morning I refitted the head shield into the exhaust tunnel and routed the O2 sensor wiring behind it.

Next up was to get the twin downpipes fitted and of course they were touching the steering rack slightly. I've no idea why but 2 second with the belt file meant that they didn't touch any more:

1000058471.jpg


Once fitted I offered up the cutting with the O2 sensor and called my fabricator friend to come measure up to make a piece to bridge this gap:

1000058527.jpg


I'm currently working on making the mk3 radiator fit the mk2 and it's quite the task. I'll update in a few days tho.

Connor
 
Last edited:

da.murf

RMS Regular
Messages
10,344
Drives
Nissan 350z
Saturday afternoon my Amazon order of 5mm rope arrived so armed with it, PTFE spray and a new windscreen Stefan and I got to work. I didn't take any pics as its a job I hate but after 20mins of ****ing around we were left with this:
View attachment 429067

With the windscreen in that meant I could fit the dash and the other interior bits.

How it started:
View attachment 429068

Dash shell in:
View attachment 429069

Furnishing the dash with all its wee vents, bezels etc. I didn't remove any of this and it's years since I owned a mk2 so this was a slow process:

View attachment 429070

At this point I realised I was missing the lower dash panels and centre console so I moved onto the rest of the interior:

View attachment 429071
View attachment 429072

Under the dash starting to look tidier already:
View attachment 429073

A quick 23:00 phone call from the back seat sorted me with all the missing interior pieces I needed and I'll lift them this week:
View attachment 429074

Then to finish the night off I got the last door card on:
View attachment 429075

I really love this interior. I can't wait to get the dash buttoned up and the front seats in.

Sunday morning I refitted the head shield into the exhaust tunnel and routed the O2 sensor wiring behind it.

Next up was to get the twin downpipes fitted and of course they were touching the steering rack slightly. I've no idea why but 2 second with the belt file meant that they didn't touch any more:

View attachment 429076

Once fitted I offered up the cutting with the O2 sensor and called my fabricator friend to come measure up to make a piece to bridge this gap:

View attachment 429077

I'm currently working on making the mk3 radiator fit the mk2 and it's quite the task. I'll update in a few days tho.

Connor
Great work so far and looking forward to nosying round it at dubshed
 

natogreen16v

RMS Regular
OP
natogreen16v
Messages
8,736
Location
Space
Drives
Stuff
Great work so far and looking forward to nosying round it at dubshed
Don't look too close Dave lol. Tbf it's gona need a lot of paint touch ups, correction and even just things redone how I want them. But it should hopefully make it. It'll be a great 30footer for the show lol

Good stuff, really taking shape now. Every step now will be that bit closer to the end.

Thanks Wayne. There's still a list a mile long but it's looking more like a car every day lol

Speaking of which. I got the radiator mounted in the car. Sunday night I started and realised it was gona be a tight fit. The standard MK2 rad sits at an angle and looks really stupid imo. The Corrado VR6 one would cool a little better but sits funny too.

I had the standard mk3 VR6 radiator with twin Spal fans mounted to it sitting doing nothing so I offered it up and got it mounted to the underside of the slam panel.

Then I offered it up and realised id have to cut a little bit out of the lower radiator support panel.

Cue, "a little bit":
1000058608.jpg

1000058609.jpg

1000058610.jpg


Once offered up I welded it terribly and decided that when I've time I'll remake this in tube at some point:
1000058767.jpg

1000058793.jpg


I removed as much of this as I could get away with and it was still this tight:
1000058794.jpg


And and overall off it fitted. I'm happy I got it to fit as the mk3 radiator is so much bigger and should aid in keeping things cool:
1000058795.jpg

1000058797.jpg


Thanks,
Connor
 

Big Pimp

RMS Trader
Messages
14,883
Location
Downpatrick
Drives
like im late
You are a very gifted young man Connor!

I’m in deep admiration of anyone who can tackle jobs I could only dream of.
 

natogreen16v

RMS Regular
OP
natogreen16v
Messages
8,736
Location
Space
Drives
Stuff
@big after calling me young man I'll never have a bad word said about you! Lol. Cheers Ross. Tbf I'm doing this **** 20yrs now and I've made and am still making plenty of **** ups. I've learned a lot tho. Having the time and space is certainly key to it. And plenty of friends for help and advice.

Last night Hugo started to look more like a car. I got the wiring buttoned up inside the wing and put the wing, headlights and lower valance on:
1000058870.jpg


When I went to mount the headlights I didn't like the screws for it so I drilled out the panel and installed Rivnuts to mount them. This is how most things will eventually end up on the car when I get around to tidying it all over the next few months:
1000058863.jpg

1000058864.jpg


Then it was time to mount the bumper and grill:
1000058872.jpg

1000058873.jpg

1000058874.jpg


So the front end is looking more complete thankfully.

Stefan also changed the 2 front wheel bearings for me which helped to take something off my long list of ****.

Today then the wheels were lifted from Autoworx in Lurgan who did a great job on them. I wanted a bright metallic silver and they nailed it. Lurgan Tyre Centre were my next port of call for getting the tyres on and as always a perfect job from them.

I popped the new centre caps in and grabbed a quick photo. The wheels need a wipe down but I'm delighted.

1000058991.jpg

1000058993.jpg


Then I popped 2 on the back to see what spacer I need on the stub axles.

I love when there's tight clearance between wheels and brakes and I think I've achieved that.

1000059016.jpg

1000059012.jpg


Then I popped a 3mm spacer on the wheel and dropped it to find this. So I'll space the stub axle 3mm for a perfect fit and it makes I don't need to **** around with universal spacers.

1000059025.jpg


Connor
 

Big Pimp

RMS Trader
Messages
14,883
Location
Downpatrick
Drives
like im late
Holy good fook! Another coat of paint on those callipers and the wheels won’t fit! You could hardly squeeze an after eight in there!

Love how low and tucked that wheel and arch is looking. Absolutely mega.

I was convinced I was going to have my OZ wheels on my van done satin bronze but I love hyper silver and those look nigh on perfect.
 

natogreen16v

RMS Regular
OP
natogreen16v
Messages
8,736
Location
Space
Drives
Stuff
So it's been a crazy week or so trying to get this ready for dubshed.

I'm probably missing some stuff here but I'll try update.

I installed the rear axle spacers to sort the back out.

Then I bolted up the front brakes and tried the wheels on which required a 10mm spacer to clear the brakes and found this horror show:
1000059119.jpg


So after some tickling with a grinder, a half worn set of brake pads thanks to @cauld1 and a touch of camber which I wasn't happy about I got a somewhat acceptable fitment
1000059136.jpg

1000059359.jpg


The biggest problem with this car is the mk3 golf wide track front suspension. With plastic arch trims etc it is doable but with the plain metal arches it's a nightmare for wheel fitment. I've a plan to address this down the line which means less camber and a full sent of brake pads, I've just no time currently for this weekend.

Calipers were primed and painted:

1000059348.jpg

1000059345.jpg


I couldn't find my driveshafts so I borrowed an old ****ty pair. They got a quick lick of paint and thrown in for now.

Speedo connected up, shifter cable bracket sourced, painted and fitted, water hoses connected (I couldn't find my OEM top one so I'd to make something up for now), slower grill in, intake pipe fitted properly, gear linkage adjusted, clutch bled, C pillar trims installed, rain tray fitted and a million other wee odd jobs that I didn't photograph or no one would care to see. Either way, it's been hectic and this thing has fought me on even the simplest of jobs.

A friend came round and made a piece for the exhaust to go between the downpipe and the track slag exhaust. I was happy with how it turned out nevermind for a very last minute job that he turned out for me
1000059170.jpg

1000059323.jpg


I mentioned how this car has fought me all the way and at one point we set the car down off the ramp onto blocks. I slowly rolled off the blocks, onto my foot with zero chance of getting it back out. Thankfully I could reach the buttons for the ramp and had to lift it off me but damaged the bottoms of the wings:
1000059536.jpg


Then the anti rattle clip came free of the caliper (I assume as it's aftermarket it wasn't a perfect fit) and it damaged the freshly powdercoated wheels and the caliper of course:
1000059857.jpg

1000059856.jpg


The throttle cable for the aftermarket pedal box was seized solid and needed to be cut out. With no time to order one I ****ed off to Halfords, bought a bike brake cable and made one up. It's dragging slightly but it'll be enough for now to drive it on a trailer. I also only had one nipple to use so I made one up from an M8 bolt and some nuts:
1000059854.jpg


I had a choice between the CL splitter or the chunky 16v splitter. I picked the 16v splitter as I thought it kinda went better with the bigger wheels:
1000059891.jpg


I'm missing so many things here but we'll update what happened yesterday in the next post

Connor
 

natogreen16v

RMS Regular
OP
natogreen16v
Messages
8,736
Location
Space
Drives
Stuff
Yeah it's been tight going the last few weeks. Fun times going into Dubshed weekend which is a long weekend for us anyway lol

Anywho, yesterday then.

I fired the car up and drove it outside for the first time in my ownership. That was a bit of a boost mentally as I've been on the verge of burnout the last week or so. However, I ****ing hate the floor mounted pedal box. Something else to change down the line.

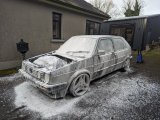
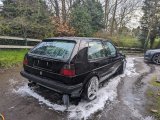
So the car was painted back in 2018 and having been to a detailer in Matt's ownership it was pointed out how incredibly soft the paint was. Great news for straight black paint which already shows every mark.

The car had sat uncovered in a dusty, damp shed for a few years and was covered in this dirt and bird ****. I was dreading what the paint was like and even me washing it making it worse.

I'm far from a detailer or even caring about that stuff so it's not my wheelhouse.

This is what I started with:
1000059962.jpg


I citrus sprayed it, power washed it, snow foamed it, powder washed it then snow foamed it again and washed it with a mitt.

1000059964.jpg

1000059971.jpg


When I got it inside and dried off it wasn't as bad as I expected. Obviously swirls, a few scratches on one wing and the roof being the worst with hazing and bird **** marks
1000059984.jpg
1000059990.jpg
1000059992.jpg


I spoke to a friend who advised me on the best way to go with what products I have and I got stuck in.

This is what I got achieved last night and while it'll not be to a pro standard it's a lot better than it was and it's a lot better than I ever expected:
1000060009.jpg
1000060007.jpg


@PaddyN called round to help me tape up with the buffing then he cleaned the bay and got the lower half of the dash and centre console fitted too which was a huge help:
1000060013.jpg


Tonight will be the last push to see what can be done before bringing the car down to the show on Friday. Fun times 🤣

Connor
 

Attachments

  • 1000059964.jpg
    1000059964.jpg
    618.3 KB · Views: 0
  • 1000059971.jpg
    1000059971.jpg
    696.4 KB · Views: 0

Gaz86

RMS Regular
Messages
4,609
Location
A land far far away
I'd have had a nervous breakdown after all that mate. Fair play for getting through that much! I'll not be able to make it this weekend unfortunately but hopefully see it some other time.
 

Laundrymike

RMS Regular
Messages
2,939
Location
Belfast
Drives
T4, S3, Mini
Some great work there and weirdly reassuring to see it's not just me that gets faught with old VAG scrap - sorry to see the damage though, but I'm sure you'll get it sorted!!
 

Big Pimp

RMS Trader
Messages
14,883
Location
Downpatrick
Drives
like im late
Good God Connor.

I’m stressing about bottling and labelling and cubes of product not arriving in time.

You’ve built a f*ckin car!!!!

Hats off to you sir. Looking forward to getting to see it at some stage tomorrow
 

Tufty

RMS Regular
Messages
7,456
Location
Co Armagh
Drives
RS3/RS4/S6
This has fairly shifted up gears from I last saw it.

Fair play Connor you have turned this around in no time and made a proper car of it.

The wheels came up a treat and really suit the car(y).

If you decide to sell the pedal box let me know as I might take it off your hands.
 

natogreen16v

RMS Regular
OP
natogreen16v
Messages
8,736
Location
Space
Drives
Stuff
Cheers lads. I'm tired and sore but it's as good as it's gona get.

@Big Pimp I'd say it's more thrown together than built as it's certainly not up to my standard, especially in the bay, but it's the first car I'll have shown on 6yrs which is a scary thought. So **** it, it is what it is lol.

Paddy and I got it cleaned up last night and touched up a few bits and pieces. Stefan is gona trailer it down today and I'll throw some pics up when I get it parked up 😁

@Tufty it might be earmarked but if not I'll certainly give you a shout. I've a top mount pedal box to fit instead, it's just getting the time is the issue
 

Boksic

RMS Regular
Messages
2,884
Location
Cushendun
So this weekend it was all hands to the pump again.

After getting home from work on Friday I started into fitting the MK4 02J shifter and cables for the gearbox.

The frame in the tunnel under the car would not take this shifter at all so the tools were broken out.

It started like this:
View attachment 429055

Then after a tickle with the grinder and belt file I ended up with this. Then it was marked up and 2 rivnuts inserted to bolt the back of the shifter into:
View attachment 429056

This is the shifter. The 2 studs at the front end needed swapped for longer ones:
View attachment 429057

So it was stripped down to swap them out for longer M8 bolts and offered up:
View attachment 429058

Then the position of the front studs were marked on the floor, drilled and offered up to find this:
View attachment 429059

Then the studs were trimmed down and edge of the opening was filed back to allow the bell crank to move through it's full range:
View attachment 429062

And how it looks underneath all sealed and painted again:
View attachment 429063

Cheers, this is going to be my instructions on doing it to my own car, have had the parts all lying about for ages but you've made it look simple enough 👍🏻👍🏻

Car looks great, some effort put in!!!!
 

natogreen16v

RMS Regular
OP
natogreen16v
Messages
8,736
Location
Space
Drives
Stuff
Cheers, this is going to be my instructions on doing it to my own car, have had the parts all lying about for ages but you've made it look simple enough 👍🏻👍🏻

Car looks great, some effort put in!!!!
It's very simple. I can always advise more if you need.

Got the car down to the show today. Gave him a wipe down and went to park some cars.

1000060196.jpg
1000060198.jpg
1000060201.jpg
1000060202.jpg
1000060203.jpg
1000060204.jpg
1000060205.jpg
1000060206.jpg


Connor
 

carmad.

RMS Regular
Messages
3,566
Location
belfast
Drives
good old bird
Top