

You are using an out of date browser. It may not display this or other websites correctly.
You should upgrade or use an alternative browser.
You should upgrade or use an alternative browser.
1991 Golf GTi project
- Thread starter natogreen16v
- Start date
Nazor
RMS Regular
Loving it Connor like I said on IG. Looks real good on these. I was a big fan of Derek’s setup years ago. Good job sur!!!
natogreen16v
RMS Regular
OP
- Thread Starter
- #78
Thank you. They're very snug lol. I'm gona run a 3mm spacer on the back behind the wheel to let the wheel clear the caliper then I'll space the stub axle out to where I want the wheel to sit in the arch.Looks snug behind those Freelander rims - good choice BTW.
The front will need a 2 or 3mm spacer to clear the brakes or maybe file the corner of the brake carrier down to clear the spoke. It's a tight set up tbf but I love how it looks even more than I thought i would!
Cheers Patrick. Yeah I'm as surprised as anyone by how much they work lolLoving it Connor like I said on IG. Looks real good on these. I was a big fan of Derek’s setup years ago. Good job sur!!!
natogreen16v
RMS Regular
OP
- Thread Starter
- #80
Thanks Rory. They're certainly a bit silly but I love them. Lolwheels look different but class mate
pablo
RMS Moderator
- Messages
- 67,024
- Location
- Glengrimley
wheels are 
Gambit
RMS Regular
- Messages
- 13,635
- Location
- where the sun always rises
Put me in mind a bit of a set of nothelles when first seen them
natogreen16v
RMS Regular
OP
Big Pimp
RMS Trader
Absolutely fantastic sir
Nazor
RMS Regular
£100 - you cannot beat that. Puts it in perspective - thinking beyond the norm and not having to sell half your ball sack to get a set of holy grail wheels. Love it.
civicglacier
RMS Regular
- Messages
- 518
- Drives
- F10 / ATR / S2k
Just read the whole thread. Great project Connor. It looks pretty clean underneath too which is a massive bonus.
The fact that you take into the loom project like that is mental to me lol. Just getting the original in is a hard enough job in a “bare-ish” shell let alone lengthening etc. class!
Will follow this! Keep up with the updates.
The fact that you take into the loom project like that is mental to me lol. Just getting the original in is a hard enough job in a “bare-ish” shell let alone lengthening etc. class!
Will follow this! Keep up with the updates.
Ian A
RMS Regular
That is very cool. Quite unexpected too.
How much of your decision process was the amount of brake on show for these wheels?
How much of your decision process was the amount of brake on show for these wheels?
natogreen16v
RMS Regular
OP
- Thread Starter
- #91
Cheers again lads.
I'm always looking at OEM wheels to try on other cars as a cheap option.
Like the wheels for the mk3 I ran BBS RC041s. They're standard on an E36 328i Sport. I machines the face to make it sit on the front so they look bigger, polished and painted them and fitted the BBS centre badges. I think I've maybe £550 in them before tyres including buying adapters.

Then for the Cabrio it was a a cheap fun thing. I certainly wasn't spending money on wheels. So I bought some 16" Renault Scenic space savers and ran them for £38 before tyres.

Then way back on her Vento I had the L200 wheels lying in the yard and got some custom adapters knocked up for £250 then had the wheels powder coated. Again, very budget but had a big impact.

I enjoy the creative side of modifying like this rather than throwing money at bolt on stuff.
Connor
 you'll see a lot more loom work soon lol
Tbh I usually hate the dumped look but I oddly like it here. I'm gona play with it but as you know. That's the beauty of air ride
I enjoy that side of it lol
Connor
I've never been one to blow big money on wheels. Tbf I've never been one to blow big money on cars. It's always me trying to get the most for my money by doing my own work etc.£100 - you cannot beat that. Puts it in perspective - thinking beyond the norm and not having to sell half your ball sack to get a set of holy grail wheels. Love it.
I'm always looking at OEM wheels to try on other cars as a cheap option.
Like the wheels for the mk3 I ran BBS RC041s. They're standard on an E36 328i Sport. I machines the face to make it sit on the front so they look bigger, polished and painted them and fitted the BBS centre badges. I think I've maybe £550 in them before tyres including buying adapters.
Then for the Cabrio it was a a cheap fun thing. I certainly wasn't spending money on wheels. So I bought some 16" Renault Scenic space savers and ran them for £38 before tyres.
Then way back on her Vento I had the L200 wheels lying in the yard and got some custom adapters knocked up for £250 then had the wheels powder coated. Again, very budget but had a big impact.
I enjoy the creative side of modifying like this rather than throwing money at bolt on stuff.
Connor
Cheers. I'm not great at the wiring but I do enjoy it. Most of the timeJust read the whole thread. Great project Connor. It looks pretty clean underneath too which is a massive bonus.
The fact that you take into the loom project like that is mental to me lol. Just getting the original in is a hard enough job in a “bare-ish” shell let alone lengthening etc. class!
Will follow this! Keep up with the updates.
you'll see a lot more loom work soon lolMe too. I'm gona space the stub axle rather than the rear wheel to keep it tight.Love how close the caliper is to the barrel! Class choice Connor
Thank christ for that second photo of how itll look with tires and spacers, thought you'd lost your mind for a moment
Wheels look really well on it.
Tbh I usually hate the dumped look but I oddly like it here. I'm gona play with it but as you know. That's the beauty of air ride
It certainly didn't annoy me that they show off the brakes wellThat is very cool. Quite unexpected too.
How much of your decision process was the amount of brake on show for these wheels?
I enjoy that side of it lolConnor
Air ride Golf on Land Rover rims, sounds like a felters wet dream!!
In all seriousness though, they do look the part on it, and probably suit the small bumpers better.
Also think you should paint the front calipers green to match the rears, it strangely works too!
In all seriousness though, they do look the part on it, and probably suit the small bumpers better.
Also think you should paint the front calipers green to match the rears, it strangely works too!
natogreen16v
RMS Regular
OP
- Thread Starter
- #94
That's what I love about it. It was kinda like taking what they do and making it work lol.Air ride Golf on Land Rover rims, sounds like a felters wet dream!!
In all seriousness though, they do look the part on it, and probably suit the small bumpers better.
Also think you should paint the front calipers green to match the rears, it strangely works too!
@Boydie she had L200 wheels on the Vento. Is that what you're thinking of?
Anyway, thank ****. I've been chasing issues on this thing to get it running for a few weeks and was losing heart in it. I've been trouble shooting it on and off, finding faults, fixing them and still it wouldn't start. I was then forgetting what I had and hadn't done so saturday I sat down and made a list of the very basics to work through.
The fuel pump wiring was swapped to that of a mk3 Golf to suit the mk3 pump/tank. All other little bits to make the VR6 work in the mk2 was done.
Towards the end of the list I found the final problem. I checked the crank sensor with the multimeter and it was reading 0 ohms.
I decided to pull one from an engine I had lying outside, cleaned it up, checked it and it had some kinda reading which seemed better than 0 to me.
So in it went, turned the key and it fired first time. Thank ****! Here's it running with no downpipes and half the sensors missing.
Once it was running I was much happier. So next to sort the fuel leak. Turned out one of my lines had a weld burns under the coating. Once the system pressurised it popped and pissed everywhere. I've ordered a brand new genuine line from VW for the feed and currently trying to track down a return line.
Sunday then I began looking at relocating the engine looms. It's all shaped to route through a mk3 bay and this is going into the wings meaning it'll need extended in places.
I then started to pick the loom apart. The engine loom runs back to 3 plugs on the fuse box. Plug F, G1 and G2.
I depinned anything not needed and F ended up with a single wire left for the starter so I separated it out totally.
Now this week I'll be organising the loom as best I can and start to extend it where needed.
Dubshed draws ever closer

Connor
Attachments
@natogreen16v I was pretty certain you had these rims on something in the past in silver? then they popped up every where 

natogreen16v
RMS Regular
OP
- Thread Starter
- #96
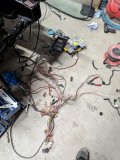
So after the success of getting the car running it was time to take a step backwards and make it not run. I wanted the engine looms hidden inside the wing so it was time to chop it in half and extend it.
I plugged everything into the fuse box, positioned the ECU approx behind the glove box and ran the wiring out through the wing. The main engine plug ended just ahead of the wheel so I measured from there along the route and up to the engine and extended each wire by that amount.
I had a spare VR6 loom that had been "converted" to run on a CE1 fuse box which is mk1 and early mk2 Golf. I didn't really trust it so decided to cut it up and extend each wire with the same colour and thickness to keep my weird brain happy.
However I noticed the loom had been extended so I stripped the tape off the solder joints to inspect the work before using it. And I'm glad I did because this was the joint I found


So that loom was a total write off so @Fatman appeared with a full loom from a Renault 5 turbo with no wiring plugs so I picked it apparent for what I needed. Seemingly the French only know a handful of colours and don't use tracers on their wires but it'll do me for sure:

Then it was a case of cutting one wire at a time, strip the ends, take the donor wire, continuity check it, crimp it either end, heat up the heat shrink ends and move to the next wire. Much easier to type than do for 50+ wires:

Then once it was fully extended I bundled it together to check the routing of it:


After that I had the 2 knock sensors and crank sensor wires to run. They are shielded and thankfully I got away with only having to extend the front knock sensor one:

More to follow here
Connor
I plugged everything into the fuse box, positioned the ECU approx behind the glove box and ran the wiring out through the wing. The main engine plug ended just ahead of the wheel so I measured from there along the route and up to the engine and extended each wire by that amount.
I had a spare VR6 loom that had been "converted" to run on a CE1 fuse box which is mk1 and early mk2 Golf. I didn't really trust it so decided to cut it up and extend each wire with the same colour and thickness to keep my weird brain happy.
However I noticed the loom had been extended so I stripped the tape off the solder joints to inspect the work before using it. And I'm glad I did because this was the joint I found
So that loom was a total write off so @Fatman appeared with a full loom from a Renault 5 turbo with no wiring plugs so I picked it apparent for what I needed. Seemingly the French only know a handful of colours and don't use tracers on their wires but it'll do me for sure:
Then it was a case of cutting one wire at a time, strip the ends, take the donor wire, continuity check it, crimp it either end, heat up the heat shrink ends and move to the next wire. Much easier to type than do for 50+ wires:
Then once it was fully extended I bundled it together to check the routing of it:
After that I had the 2 knock sensors and crank sensor wires to run. They are shielded and thankfully I got away with only having to extend the front knock sensor one:
More to follow here
Connor
natogreen16v
RMS Regular
OP
- Thread Starter
- #97
So next up was to get the rev counter working. The VR6 sends the rev counter signal digitally to the mk3 clocks but the mk2 clocks expect to see an analogue pulse from a coil. So time to knock together some wires, diodes and heat shrink and run it all from the coil to the clocks. Taking signals off 2 of the 3 coils will make the 6cyl rpm work properly with the 4cyl clocks:


So once I test started the engine it started and ran perfectly. Happy days, my wiring loom extension didn't cause any issues.
Did the rev counter work? Did it ****! But we'll revisit that some other day
Then i wrapped the loom in the bay:

Oddly I don't have a finished pic of it.
And spiral wrapped the rest of the loom back into the car and I'll fix it to the power cable properly when the front end goes on:

Then it was time to move inside and sort out all the wiring mess I'd ran behind the dash:


Once I get the wiring ran inside and out permanently I'll put up the finished pics.
One of my new genuine fuel lines appeared and I got it fitted too. The rest is coming this week along with a bunch of other bits:

Connor
So once I test started the engine it started and ran perfectly. Happy days, my wiring loom extension didn't cause any issues.
Did the rev counter work? Did it ****! But we'll revisit that some other day
Then i wrapped the loom in the bay:
Oddly I don't have a finished pic of it.
And spiral wrapped the rest of the loom back into the car and I'll fix it to the power cable properly when the front end goes on:
Then it was time to move inside and sort out all the wiring mess I'd ran behind the dash:
Once I get the wiring ran inside and out permanently I'll put up the finished pics.
One of my new genuine fuel lines appeared and I got it fitted too. The rest is coming this week along with a bunch of other bits:
Connor
seanmooney
RMS Regular
- Messages
- 3,656
- Location
- Armagh
I had to do the same thing for the speed signal to my electronic clocks
I ended up using a speed signal relay which was a very handy job.,
.jpg")
I ended up using a speed signal relay which was a very handy job.,
natogreen16v
RMS Regular
OP
- Thread Starter
- #99
Is that for converting an ABS sensor signal into a speed signal Sean? I was picking up a signal for a rev counter but the speedo in this car uses a cable. But that's a handy one to know for the future. Can you calibrate it for different speeds?
seanmooney
RMS Regular
- Messages
- 3,656
- Location
- Armagh
Is that for converting an ABS sensor signal into a speed signal Sean? I was picking up a signal for a rev counter but the speedo in this car uses a cable. But that's a handy one to know for the future. Can you calibrate it for different speeds?
Ah sorry i read that wrong, i thought you had to get speed.
I used an abs hub and ran 2 wires from it to the In1 and in2 on the relay and then the out pin went to the clock .
No i don't think you can calibrate there's no settings on it.
-
This site uses cookies to help personalise content, tailor your experience and to keep you logged in if you register.
By continuing to use this site, you are consenting to our use of cookies.