The Carbon Fibre/Composites Thread

Con

RMS Regular
OP
Con
Messages
5,711
Location
Northern Ireland Again
Drives
JDM Honda Del So
With a bit of free time over Xmas I can update with a How To sort of for folks if they want to give it a bash.

20200511_224147.jpg


20200920_184345.jpg


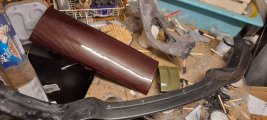
So firstly obviously find a panel you would like to Carbon skin.
In this case I a plastic door card insert but a dash piece or mirror cover or bonnet is the same process.

These door tops are usually covered in a vinyl or various materials. This needs stripped off back to the bare plastic, I find a wallpaper stripper really good to shave it all off.
28 Year old 90s Honda contact adhesive is easy to remove.

20180813_123257.jpg


Seen here in bare plastic form along with some speed shapes...again using the same process skinning or overlay.

DSCN4869.JPG


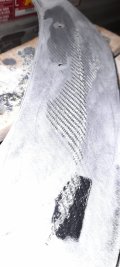
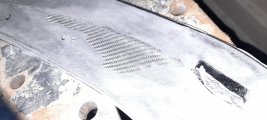
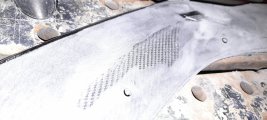
Once you have your part ready it's time to make a mechanical lock for the Epoxy Resin to adhere to.
Exactly the same as keying for a clear coat scoring up for a good bite between materials.

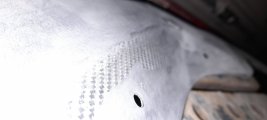
I like to use a tool with 4 Stanley blades together to get 4 score lines at as time, the more key marks the better the bite.

On dash trims and parts that have had wax or silicone polishes on top in past...this is important to get a good bite and remove all contaminants as the same with paint, will fish eye and cause problems down the line.

Panel wipe and tack clothes are your friend to remove all particles.

DSCN4867.JPG


Stage 2 is Epoxy Resin Time.

I use XCR Black Epoxy


For a part like these speed shapes which are white there is a high chance the white will show through and generally most parts are black or somewhere in between.
So it's good practice to use a Black tinted Epoxy resin that way your covered and have a good flat base colour for your fabric to overlay.

20171125_203510.jpg


So...2 Part Epoxy A & B which is black

Weigh out amounts of both usually around 4:1 so 25g for part A and 10G Hardener

For about 30x30cm area 35g using a normal paint brush, spread it on thinly in stipple into crevices and edges.


20201112_014800.jpg


20201112_014816.jpg


Once the layer has reached B Stage, this is where its tacky and when touched doesn't leave residue.

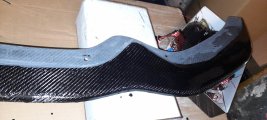
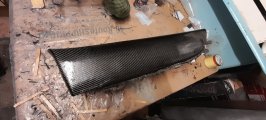
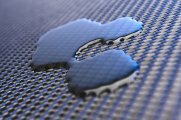
Your ready to lay the fabric, in this case Carbon 2x2 Diagonal twill 210gsm is used.

2x2 is the weave setup over lapping the fibres.

Some fabric is listed at 3k, 6k 12k.

The K is the Thousands of individual strands of carbon.

So a higher number means more strands which is thicker fabric.

A thicker fabric is stronger but...the caveat is its stiffer in raw form so...it's harder to lay into curves and more expensive.

Generally the average Carbon bonnet will have a thin 210gsm 3k or 4k visual layer.

20201112_015223.jpg


TOP TIP: Use the removed cover as a template or masking tape to avoid waste

20201112_025045.jpg


20201112_025135.jpg


20201112_025139.jpg


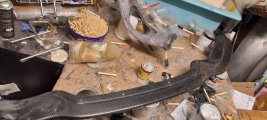
Lay the fabric flat and smooth out as much as possible working from the middle out wards like vinyl wrapping.

Tuck edges with tape making sure there is good contact and secure on backside.

From this stage you can throw it into a vac bag to pull pressure and hold the fabric tightly until it cures. Usually around 12-24 hours.

I use a composites vac pump but there have been good results posted online of folks using the clothing bags for the normal trusty hoover.
 

Attachments

  • 20201113_024936.jpg
    20201113_024936.jpg
    245.6 KB · Views: 46

Con

RMS Regular
OP
Con
Messages
5,711
Location
Northern Ireland Again
Drives
JDM Honda Del So
20180930_004325.jpg


Once the fabric has adhered to the part its ready for laminating.

The Epoxy should be the same brand and used as a 4:1 ratio helps

So you can gauge similar amounts for covering each layer.

The first layer on dry fabric absorbs alot more than the next layers so thicker on the first layer works.

20170918_014731.jpg


8138150357_1fa700f848.jpg


Generally I do 2-3layers and then vac bag again with peel ply and breather cloth but about 4 sittings of clear resin and leave to cure can work.

The peel ply gives a good surface for more resin but on curve heavy parts ls helpful.

IMG_20180501_124934_146.jpg


Following the instructions on the resin generally is about 1 hour 30 mins between coats.

So to do a few layers in a day is good to start early enough.

I find a foam brush works well to spread better than a bristle paint brush as they come off into resin onto part sometimes.

Having spent many nights past 1am just waiting for 1 more layer makes sanding the next stage much easier.

Sanding with around 120 grit working your way up works well you will see low spots around 180 grit and a few layers of resin will fill these in easily enough following the same steps as before.

Use Air duster, Vac, Panel wipe and tack cloths to remove contaminants before you lay more epoxy resin.

20181008_213321.jpg


20180822_165213.jpg


Use a Dremel with a Perma- Grit Tungsten Carbide disc to cut holes and edges like butter depending on the part


20181009_111307.jpg


A few more layers repeating processes then sanding up to 400 grit and your ready for clear coat.

20181009_214250.jpg


Clear lacquer is any normal 2K spray generally 2part booth work is best.

Cut and polish the same as normal body work. Spray cans can be used but wont yield as good result.
 

Attachments

  • 8138150357_1fa700f848.jpg
    8138150357_1fa700f848.jpg
    106.7 KB · Views: 30
Last edited:

southsky sunrise

RMS Regular
Messages
11,088
Drives
Old skool
In this case unfortunately you are correct.

Skinning takes too many hours and my own car has been crying out for pieces to be done.

Give it a bash really isnt too difficult
Nah Conor I jest fs I never keep a car long enough to justify puttin anymore more time or money into it unless it was under the bonnet bro
 

gav525

RMS Regular
Messages
10,298
Location
Co Down
Drives
Anything
Great work @Con (y)

Used to love working with the stuff, worked in an aircraft carbon fibre repair and manufacturing workshop, just myself and one other guy so was a wee hidden gem. Spent more time doing homers than actual aircraft work, made Nova mirrors, a rally car light pod, AX GT door skins, even a bodyboard. Materials were "free" through work so was great lol.

The course they sent me on was great, got to go to the Jordan F1 factory where they made the car parts, and then spent a few weeks hammering holes in to a non air worthy Harrier jet to then pull out the damage and perform a repair to be examined. Good times!
 

Con

RMS Regular
OP
Con
Messages
5,711
Location
Northern Ireland Again
Drives
JDM Honda Del So
Great work @Con (y)

Used to love working with the stuff, worked in an aircraft carbon fibre repair and manufacturing workshop, just myself and one other guy so was a wee hidden gem. Spent more time doing homers than actual aircraft work, made Nova mirrors, a rally car light pod, AX GT door skins, even a bodyboard. Materials were "free" through work so was great lol.

The course they sent me on was great, got to go to the Jordan F1 factory where they made the car parts, and then spent a few weeks hammering holes in to a non air worthy Harrier jet to then pull out the damage and perform a repair to be examined. Good times!
Cheers Bud
Was that prepreg or were you laying up and wetting out by hand.

As soon as I can find an Auto Clave that's not $$$$ I will be making the transition myself
 

Con

RMS Regular
OP
Con
Messages
5,711
Location
Northern Ireland Again
Drives
JDM Honda Del So


For those who ever wondered how BMW made their Carbon Roof for the M3s

These are "Pre Preg" Dry Carbon made using 4 layers of fabric laid on top to make the layup (stack)

Put into a polished Aluminum CNC mould with the Fabric laid on top and heat pressed to melt the "Pre Impregnated" resin on fabric to mould into the part.

Notice the back side and not the visuals side use spread Tow type fabric for max stiffness advantage
 

gav525

RMS Regular
Messages
10,298
Location
Co Down
Drives
Anything
Cheers Bud
Was that prepreg or were you laying up and wetting out by hand.

As soon as I can find an Auto Clave that's not $$$$ I will be making the transition myself

That was laying up and mixing the resin ourselves. We did work with pre preg in the training course, but i can't remember now why we didn't use it on aircraft.

Autoclave would be the job, we used hot bond controllers, not even sure if they're still used as probably old technology now.
 

chrisd1

RMS Regular
Messages
4,443
Location
Japan
Drives
AE86 / EF Civic
AutoGarage Bros in Shizuoka, JP. Not sure if he's on any VW forums, likely is somewhere as he races a few VWs, and AE86s too... Seriously cool car, not for everyone,. But I love the work and extreme end of things! Gutted I won't be at Tokyo Auto Salon this year for it though...but just call in with them when I'm next near Fuji

187472546_1704626243063042_7793341341712760185_n.jpg
187015204_1704626419729691_286588376923142113_n.jpg
192785721_1712035322322134_1174770197772992744_n.jpg
142165837_1610707255788275_3095085277231230538_n.jpg
125203639_1557354424456892_3996229174389749815_n.jpg
122351599_1536652049860463_4114322982703352291_n.jpg
125523425_1557354444456890_7218568779568937386_n.jpg


The milder version is nice too for track/road...
FB_IMG_1640688121435.jpg
 

Tufty

RMS Regular
Messages
7,483
Location
Co Armagh
Drives
RS3/RS4/S6
AutoGarage Bros in Shizuoka, JP. Not sure if he's on any VW forums, likely is somewhere as he races a few VWs, and AE86s too... Seriously cool car, not for everyone,. But I love the work and extreme end of things! Gutted I won't be at Tokyo Auto Salon this year for it though...but just call in with them when I'm next near Fuji

View attachment 345111View attachment 345112View attachment 345113View attachment 345114View attachment 345115View attachment 345116View attachment 345117


The milder version is nice too for track/road...View attachment 345118
My word that’s absolutely out standing in every way possible. If my budget was endless I’d have built something like that. It’s also nice to see a 16v in there as well.
 

Con

RMS Regular
OP
Con
Messages
5,711
Location
Northern Ireland Again
Drives
JDM Honda Del So
So was tasked with repairing this BMW Splitter and thought this would be a good place for info.

This part is your typical China made part that is a single layer 0.25mm of Carbon fabric and chopped strand fiberglass backed.

These parts have a Polyester Gelcoat sprayed into mould first before the carbon and then fiberglass.

They use these Gelcoats to speed up the manufacturing process and negate the need for a proper 2K Clear all be it with drawbacks.

The Gelcoat is very brittle and thin so any damage your screwed and a new part is usually the answer.

As with many things can be fixed with time...the time being the surgical sanding off gelcoat taking care not to burn through into the White fiberglass behind.

Damage was along the front edges and where it mounts to the bumper

20211227_141845.jpg


20220116_170943.jpg

20220116_182258.jpg


20220116_180315.jpg


On the edges you would use a Milled Carbon filler powder mixed with some Clear Epoxy this give a repair paste that matches the Black of the Carbon fabric.
20220123_220537.jpg


20220123_213551.jpg

20220123_213615.jpg


20220123_213600.jpg


Ideally if you want a perfect finish...a fresh layer of Carbon fabric would be laminated on and then layered up with Clear Epoxy in the same process....but that would be double the time and extra costs spent.

Or best case Scenario have the plastic part and make a mould from that to make a proper full carbon part.

So if you damage your Carbon part just cry as your stuffed.
 

Attachments

  • 20220123_213642.jpg
    20220123_213642.jpg
    196.9 KB · Views: 22
  • 20220123_213605.jpg
    20220123_213605.jpg
    212.7 KB · Views: 22
  • 20220116_182306.jpg
    20220116_182306.jpg
    188.2 KB · Views: 23
  • 20220116_180256.jpg
    20220116_180256.jpg
    189.9 KB · Views: 25
  • 20220116_180248.jpg
    20220116_180248.jpg
    58.3 KB · Views: 25
  • 20220116_180240.jpg
    20220116_180240.jpg
    95.5 KB · Views: 23
  • 20220116_180236.jpg
    20220116_180236.jpg
    225.4 KB · Views: 23
  • 20211227_141830.jpg
    20211227_141830.jpg
    232 KB · Views: 21
  • 20211227_141811.jpg
    20211227_141811.jpg
    221.3 KB · Views: 24

Con

RMS Regular
OP
Con
Messages
5,711
Location
Northern Ireland Again
Drives
JDM Honda Del So
Now the part is back from painter you can very slightly see the repairs around the edges.

The typical China part is a balls to repair but can be done, using the milled Carbon mixed with Epoxy gives a very close colour match.

20220206_174822.jpg

20220206_174828.jpg

20220206_174836.jpg

20220206_174841.jpg

20220206_174850.jpg

20220206_174900.jpg

20220206_174910.jpg

20220206_174933.jpg
 

roverspeed

RMS Regular
Messages
7,488
Location
Belfast
Drives
Insignia
Doesn't skinning stuff in carbon fibre negate the point of carbon fibre? As you are making the part heavier than it was before....looks cool though
 

Con

RMS Regular
OP
Con
Messages
5,711
Location
Northern Ireland Again
Drives
JDM Honda Del So
Doesn't skinning stuff in carbon fibre negate the point of carbon fibre? As you are making the part heavier than it was before....looks cool though

Yes depending on the application.

The majority of Seibon and other China made parts are sinlge layer of carbon over fiberglass the weight saving is minimal as the fiberglass is heavy in comparison.

Like if your going to make a Carbon Bonnet but only skin the top of the OEM metal with Carbon it will add at least 1kg, but the body lines and fitment will be bang on.

But if you are doing something along the lines of Carbon Doubling in areas like floor pan, firewall or shock towers you are adding weight but multiplying the Stiffness.

If an interior part has mechanisms or tabs.....is much easier to skin on top of plastic for the aesthetics.

The hours spent skinning can easily make a mould and a full carbon part from that mould in same time frame depending on the part like a splitter
 

Dynam0humm

RMS Regular
Messages
735

That's pretty shabby on the Zonda imo - Horacio always came across as someone who took pride in all the tiny details and that was one of the things that set Pagani apart from the rest when they were just a young upstart, but then you notice the centre ply on the bonnet just going in a random direction... I'm surprised that it made it past the first QC stage nevermind it ending up with a customer.

Same with the Lambo - it's an awesome looking piece of CF and it's all going so well until you notice the differing direction of the ply's above and to the side of the headlights.

Call me fussy, but if I was commissioning a seven figure hypercar and I was presented with either of those they'd be swiftly rejected.
 
Last edited:

Con

RMS Regular
OP
Con
Messages
5,711
Location
Northern Ireland Again
Drives
JDM Honda Del So
That's pretty shabby on the Zonda imo - Horacio always came across as someone who took pride in all the tiny details and that was one of the things that set Pagani apart from the rest when they were just a young upstart, but then you notice the centre ply on the bonnet just going in a random direction... I'm surprised that it made it past the first QC stage nevermind it ending up with a customer.

Same with the Lambo - it's an awesome looking piece of CF and it's all going so well until you notice the differing direction of the ply's above and to the side of the headlights.

Call me fussy, but if I was commissioning a seven figure hypercar and I was presented with either of those they'd be swiftly rejected.
I noticed the V weave as well.

Pretty crazy money to be lacking in the final finish
 

RoniN

RMS Regular
Messages
4,386
@Con was just looking at Easy Composites website for the small starter kit, as I'd like to skin a small part.
Completely in shock when I seen they charge £33 postage to N.Ireland.

Where do you get your materials?

Cheers
 

Con

RMS Regular
OP
Con
Messages
5,711
Location
Northern Ireland Again
Drives
JDM Honda Del So
@Con was just looking at Easy Composites website for the small starter kit, as I'd like to skin a small part.
Completely in shock when I seen they charge £33 postage to N.Ireland.

Where do you get your materials?

Cheers
From Easy Composites postage is a killer and takes a week
 

RallyCiaran

RMS Regular
Messages
1,636
Location
Ballymena
Drives
Nova 1600 8v
Do MB in Belfast carry what you need?

In work we use Tricel in Newry for a lot of our materials. Though they are more wholesale rather than hobby.
 
Top