

You are using an out of date browser. It may not display this or other websites correctly.
You should upgrade or use an alternative browser.
You should upgrade or use an alternative browser.
79' Opel Kadett C Build - Built Show Smash to Road Rocket

- Thread Starter
- #127
It would only be right! Lol obligatory photos at murphys pier and then a spin back up the glens home
- Thread Starter
- #128
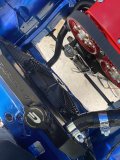
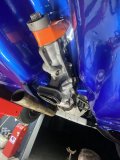
Fouling the anti roll bar with the pulley so will need to swap it for a GTE anti roll bar if I can convince Paul to part with it. Either that or one inch spacer to the arb mount should be fine. Aside from that she’s in and sitting as low as possible and as far back as is possible. Fair play, Paul made a right job of making up these chassis mounts to leave her in the right place. Gearbox should be ready for her this week. Then measure up propshaft so we can shorten it and stick a type9 yoke on the front. Need to take the Weber’s off and have the manifold skimmed a little as it’s weeping water at one end.
Anyway it’s bolted in for now:
At this stage I’ll be doing well if she’s on the road for the summer. Might have to trailer it to the reception and park it outside!

seanmooney
RMS Regular
- Messages
- 3,656
- Location
- Armagh
Happy days , great to see the engine in.
If you could work the spacers would it be a handier option ?
If you could work the spacers would it be a handier option ?
- Thread Starter
- #130
Well that’s been a hectic l couple of months. With finishing the house/garage and getting married I lost a bit of time off work so as soon as all that was by I was flat out shooting jobs to make up for it. Didn’t get working at the Kadett much, however I did swap the inlet manifold as it was weeping. New inlet manifold needed ported to match the size of the inlets on the head. Jonny sorted that and now we’ve the carbs back on and alternator on. I had to wait a while on the adjustable alternator bracket coming but now that it’s her it’s a good job. Much tidier than the sliding brackets and definitely less likely to shift.
Took a wee bit of time to get the Astra prepped for MOT. First proper detail in the new garage. Lift is a game changer.
Got a half hour at one stage to get the radiator, fan and plumbing fitted.
So plan of action is to slot the gearbox in and bolt it in so we can measure for the prop shaft, and then make up a gearbox mount to use the original holes for the type 9 Ford box.
Once gearbox is in place and jacked up into position it should level out the angle of the engine front to back which will allow me to accurately measure the spacer needed for the front arb.
Once all that’s done we’ve still quite a list.
MBE Ecu needs spliced into original loom. Original loom back in the car already and wired into all the usual lights etc
All the brake lines need made and plumbed in.
Fuel line is run but not mounted with brackets through the shell yet.
Hopefully get a bit more done asap.
Last photo is of Kieran O’Neills two Kadetts. He called in on the way home from a run to collect some parts for his rallye. Great fella and knows these cars inside out and is always willing to give advice and or parts if he has them!
Attachments
- Thread Starter
- #132
Handy for us we poured a 9inch pad first and then poured the rest of the floor around two boxes and Ducting to take the cables underground to the control unit. Really great job and so handy that it’s flush when down. RedMount we’re super easy to deal with.Love the Kadetts and the picture of your lift has confirmed to me that I need to get mine (which is the same model) fitted as it's been sitting waiting on me to cut out the 'bathtub' in the current floor to fit it.
Coming along nicely!")

Enjoy it! Total game changer, my days of lying on cold concrete are over lol
- Thread Starter
- #134
Get on it! Your shoulder will thank you in the long run! LolBoxes made and sitting here, got to get myself organised and get it done. Redmount were dead on, got it in march last year and banjaxxed my shoulder on 1st April so everything went on the back burner.
- Thread Starter
- #135
Happy to say I’ve a wee update today.
After a month of getting nothing done because I’ve been mental with work, finally I got a chance to get the gearbox in after a run down to Kilbroney with Dad for the classic show.
Landed back up and Jonny arrived over to give me a hand. Gearbox in and fits like a glove. Was able to get the prop measured up too. Thankfully my existing prop is too long. So worst case Hoys can shorten this one and stick the type 9 sliding yoke on it.
Really over the moon that my measurements turned out bang on for the gearstick to come up in the right place. Thanks again to @PeteMoore or BrookFab for shortening the tail housing of the type 9 with great accuracy.
Also alternator removed and refitted with appropriate spacer to bring it forward to keep the belt straight.
Next on list. Fabricate gearbox mount and get propshaft made.
Then run brake lines and fit hydro handbrake.
R
Attachments
- Thread Starter
- #136
p.s. the supplier sent 900lb rated front tarmac springs instead of 500lb ones so they're way too stiff. The kadett is sitting like a back to front hotrod atm. New 500lb springs are on the way for the front though so should look a bit more level then.
seanmooney
RMS Regular
- Messages
- 3,656
- Location
- Armagh
Lethal.. getting there now .
Be plenty of pictures now with your fancy new garage ..
Be plenty of pictures now with your fancy new garage ..
- Thread Starter
- #138
=) Your GSI on the road yet?Lethal.. getting there now .
Be plenty of pictures now with your fancy new garage ..
Big Pimp
RMS Trader
This is beyond cool. Garage. Lift. Car. Lights. Everything
seanmooney
RMS Regular
- Messages
- 3,656
- Location
- Armagh
=) Your GSI on the road yet?
Tidying up wiring now and hope to have interior back in few weeks .
- Thread Starter
- #141
Shout out to @Jamie-g for visiting today and staying for the day. After the guts of an hour rowing with a stuck ball joint we managed to get the two 700lb front springs out and two 500lb springs in instead. Much better now and it’ll settle further in time.
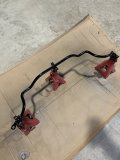
Removed the anti roll bar to make way for the GTE anti roll bar I got last week, a miracle in itself. Turned out a good friend realised he had a spare he’d picked up years ago and forgotten about. Talk about under yer nose.
This is her with the super hard 10inch springs. You could fit leyland tiger in between the wheel and the arch here. Granted this was with old stretched rubber.

New yokes:

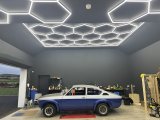
Obligatory garage light shot just for @seanmooney


This GTE roll bar was clarried in underseal and 45 year old paint. @Jamie-g did make short work of it tho. Clearly not the first time he’s rubbed a bar with such vigour and precision. It was down to the bare metal in no time and then he tore in with some impressive rattle can technique.

Still on the list:
Brake lines & Plumb in the Pedal Box
Fuel line run but needs mounted with brackets.
Adjustable Panhard Rod being made atm
Prop shaft with Hoys getting made up
Gearbox Mount needs fabricated
MBE needs spliced into existing loom.
+all the other things I’ve probably forgotten
Removed the anti roll bar to make way for the GTE anti roll bar I got last week, a miracle in itself. Turned out a good friend realised he had a spare he’d picked up years ago and forgotten about. Talk about under yer nose.
This is her with the super hard 10inch springs. You could fit leyland tiger in between the wheel and the arch here. Granted this was with old stretched rubber.
New yokes:
Obligatory garage light shot just for @seanmooney
This GTE roll bar was clarried in underseal and 45 year old paint. @Jamie-g did make short work of it tho. Clearly not the first time he’s rubbed a bar with such vigour and precision. It was down to the bare metal in no time and then he tore in with some impressive rattle can technique.
Still on the list:
Brake lines & Plumb in the Pedal Box
Fuel line run but needs mounted with brackets.
Adjustable Panhard Rod being made atm
Prop shaft with Hoys getting made up
Gearbox Mount needs fabricated
MBE needs spliced into existing loom.
+all the other things I’ve probably forgotten
Attachments
Last edited:
- Thread Starter
- #144
I can see myself in it nowYour bar was clean stinking.
 easier worked with, with one of us at each end in fairness
- Thread Starter
- #145
Collected the prop today from Robert Hoy. Type 9 Sliding yoke fitted to what was originally the prop from the blue coupe. Here it is in place. Will replace the bolts later this week with something more suitable.

So next thing is a question really. Anyone any experience in making up gearbox mounts or any ideas of how they’ve done it for other applications with type 9. I know the oval racing boys have a kit for bolting it to a space frame but will likely need something made up specifically for this.
Im assuming all the lads putting type 9s into escorts have a much closer to oem solution.

Who wants to make me a gearbox mount? embarrassingly I can’t weld so that’s a bad start!

So next thing is a question really. Anyone any experience in making up gearbox mounts or any ideas of how they’ve done it for other applications with type 9. I know the oval racing boys have a kit for bolting it to a space frame but will likely need something made up specifically for this.
Im assuming all the lads putting type 9s into escorts have a much closer to oem solution.
Who wants to make me a gearbox mount? embarrassingly I can’t weld so that’s a bad start!
- Thread Starter
- #147
Only a wee update!
Adjustable Panhard rod back from BrookFab and fitted.


Have Paul Davisons 996 C2s in atm to detail and take some photos of as it’s up for sale. Really clean low mileage 996 with 10k+ factory GT kit fitted by Porsche in Belfast.

A couple of shots of Jonnys most recent build, too spec XE with Millington Block, cnc head etc. should be a good 300+ bhp in this one.


Hopefully Paul Mooney will sort brake lines and plumbing pedal box next month. Should be closer to starting the engine in the car soon.
Adjustable Panhard rod back from BrookFab and fitted.
Have Paul Davisons 996 C2s in atm to detail and take some photos of as it’s up for sale. Really clean low mileage 996 with 10k+ factory GT kit fitted by Porsche in Belfast.
A couple of shots of Jonnys most recent build, too spec XE with Millington Block, cnc head etc. should be a good 300+ bhp in this one.
Hopefully Paul Mooney will sort brake lines and plumbing pedal box next month. Should be closer to starting the engine in the car soon.
seanmooney
RMS Regular
- Messages
- 3,656
- Location
- Armagh
That engine is just beautiful..
- Thread Starter
- #149
Currently plastidipping the window surrounds. They’re super soft aluminium and so easy to link so wasn’t keen on wrapping them even with a few years experience at vehicle graphics during my school years. Whatever way they’re finished it’s like a sort of fake chrome anodised finish it’s mad keen to reject paint so decided I’d just spray them with vinyl paint for now. Note to self: don’t buy the Halfords stuff it’s absolute ***** and dries cloudy/matt. Nevertheless as a temporary measure it’ll do until I can figure out exactly what I wash to do with them. It’s marginally better than the pitted worn finish that was on it. At least it won’t immediately draw your eye considering the rest of the car is immaculate paint wise.

- Thread Starter
- #150
Rejoice, after a few months of knocking my pan in and saving for tarmac (horrendous when you’ve 500m2 to do) I’ve finally got the weather strips in for the door windows. Alas, surely a simple job I hear you mutter. WRONG. I’ve never come across two more thran hoor bits of trim in my life. The channels they push into must be unique to whoever’s job it was in the factory. But the first problem was finding a new old stock set of rubbers in the first place. One heritage old stock parts place in Germany had a left one and no right, the left one alone was €750. After crying for a few evenings I began the hunt for used ones in good enough condition to be re used. I made enquiries with manufacturers to see if I could get a bulk buy organised but no. No one had any intentions of making them. After 6months of searching and posting online I eventually found a set closer to home. Alex Darcy, a friend from Wrexham area had two brand new old stock weather strips in his garage that he hadn’t used. Said he didn’t even want paid for them. I insisted and gave him £100 for the set. A gentleman and just super keen to help me get another wee thing sorted. Alex is well known for his 500+ hp c20let Turbo Kadett saloon.
 www.fastcar.co.uk
Anyway, welding, paint, engine build, running gear aside this has been a most triumphant day. Because after trying to fit these a dozen times eventually I got them in today. A lot of footering with a spatula and eventually a bit of help with a rubber mallet we got there. I had to be so careful as there’s an aluminium strip inside them for rigidity and if it gets bend you’ll never get it straightened out, hence why when these are removed it’s damn near impossible to re use them. So here’s a couple of photos. I plastic dipped the chrome trim to give it the GTE look and admittedly I marked the vinyl with a plastic trim removal tool so I touched it in. Eventually I’ll take this off and have it coated or painted properly. But that’s a job for next winter if I can stomach it.
The pressure is on now. I really want to get this thing to Dubshed but Paul Mooneys brother has left for Australia and left him a man down in the business so he has much less time than he had. Already hard to get but here’s hoping I sweet talk him into giving a hand.


Tarmac Done at the house now, long live the days of not dragging gravel into the garage in the tyres of the car. Next thing on the list is to fitout the workshop end of the garage with Sealey Cabinets.


Granted this year has been mental with building the house and getting married. I’ve been working silly hours and keeping the head down to sort the priorities, finally seeing light at the end of the tunnel now though and honestly pretty chuffed we’ve managed so much. Think we’re due a holiday and I wouldn’t mind changing the daily when the prices settle. They’re going the right direction.
If you’ve read this far congrats on making it through tonight’s absolutely riveting update.
Pressures on for Dubshed, it needs more rally cars!
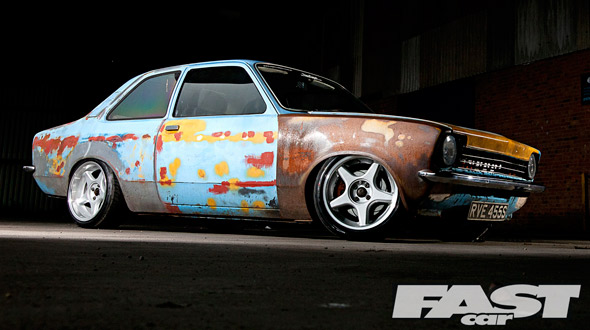
Modified Opel Kadett C
What goes into the making of the world’s Craziest Kadett? Well, bits from a Mk.2 Jaguar, Reliant Scimitar, Corsa, Evo VIII, 200sx, Pug 106, Vw Golf, Vivaro Van, Vauxhall Calibra…
www.fastcar.co.uk
Anyway, welding, paint, engine build, running gear aside this has been a most triumphant day. Because after trying to fit these a dozen times eventually I got them in today. A lot of footering with a spatula and eventually a bit of help with a rubber mallet we got there. I had to be so careful as there’s an aluminium strip inside them for rigidity and if it gets bend you’ll never get it straightened out, hence why when these are removed it’s damn near impossible to re use them. So here’s a couple of photos. I plastic dipped the chrome trim to give it the GTE look and admittedly I marked the vinyl with a plastic trim removal tool so I touched it in. Eventually I’ll take this off and have it coated or painted properly. But that’s a job for next winter if I can stomach it.
The pressure is on now. I really want to get this thing to Dubshed but Paul Mooneys brother has left for Australia and left him a man down in the business so he has much less time than he had. Already hard to get but here’s hoping I sweet talk him into giving a hand.
Tarmac Done at the house now, long live the days of not dragging gravel into the garage in the tyres of the car. Next thing on the list is to fitout the workshop end of the garage with Sealey Cabinets.
Granted this year has been mental with building the house and getting married. I’ve been working silly hours and keeping the head down to sort the priorities, finally seeing light at the end of the tunnel now though and honestly pretty chuffed we’ve managed so much. Think we’re due a holiday and I wouldn’t mind changing the daily when the prices settle. They’re going the right direction.
If you’ve read this far congrats on making it through tonight’s absolutely riveting update.
Pressures on for Dubshed, it needs more rally cars!
-
This site uses cookies to help personalise content, tailor your experience and to keep you logged in if you register.
By continuing to use this site, you are consenting to our use of cookies.